The User Account Control (UAC or, English User Account Control) is a security system that has been built into Windows since Vista. The main objective of this tool was to protect people who do not have much knowledge of malware, preventing several changes were made to the computer.
It wont be activated whenever someone tries to install or uninstall a third party application on your computer. Also, UAC is also triggered every time a change is made in the settings (affecting all accounts on the machine). While in some cases this control can be useful, it is considered one (or even annoying) function unnecessary for many.
This occurs especially when the person uses the computer alone and has control of such action on the machine. If you also do not like having to confirm the permissions for each change, learn how to disable UAC through the tutorial below.
Disabling UAC
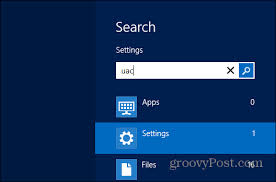
To start, let’s open the Settings screen of the control of user accounts. To do this, use the keyboard shortcut “Windows key + W”. So, in the search field, type “UAC” (without the quotes). Note that, in the left pane displays a option called “Change Settings User Account Control” and you should click it.

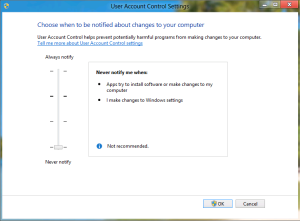
A new window opens. Note that, in it, there is a scroll bar, responsible for the security level adopted for the control of user accounts. By default, it is usually positioned on the second point (top to bottom). To completely disable UAC, all you need to do is move the pointer to the last digit
.

Then click “OK” to confirm the change. Thereafter, you will no longer receive messages requesting authorizations Control of user accounts Windows system. Later, if you want to reverse the process, simply reposition the marking of the scroll bar to the second level, as it originally stood.


